Securing Your MCP Servers with Azure API Management and Entra ID


The Problem
You’ve built an API. You’ve exposed it as an MCP server through Azure API Management. Now Copilot Studio, MCP Inspector, and GitHub Copilot can all discover and call your API as “tools” — naturally, through conversation.
But here’s the question nobody talks about: what happens when a read-only user asks the AI to delete everything?
Without proper auth, the answer is: it just does it.
In this post, I’ll walk through how I secured an MCP server with Entra ID OAuth 2.0 — from app registrations to APIM policies — and the critical gotcha that makes MCP authorization fundamentally different from REST API authorization.
What We’re Building
A Product Catalog API deployed on Azure:
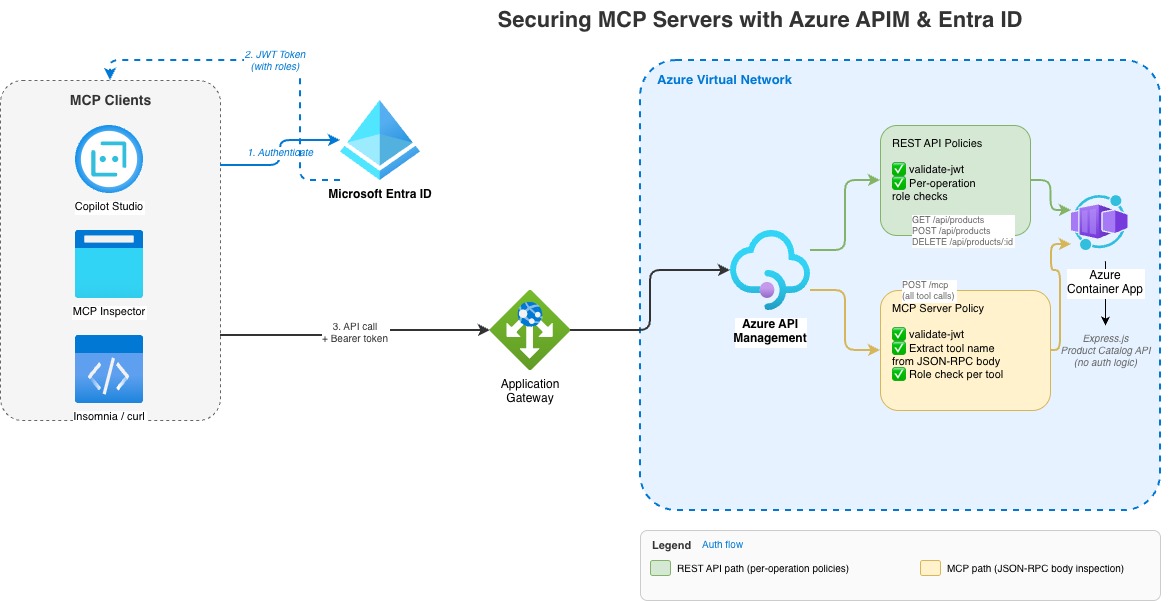
Two ways in, same backend:
| Entry Point | Used By | How It Works |
|---|---|---|
| REST API | Insomnia, curl, direct calls | GET /api/products, POST /api/products, etc. |
| MCP Server | Copilot Studio, MCP Inspector | Single POST /mcp — tool name inside JSON-RPC body |
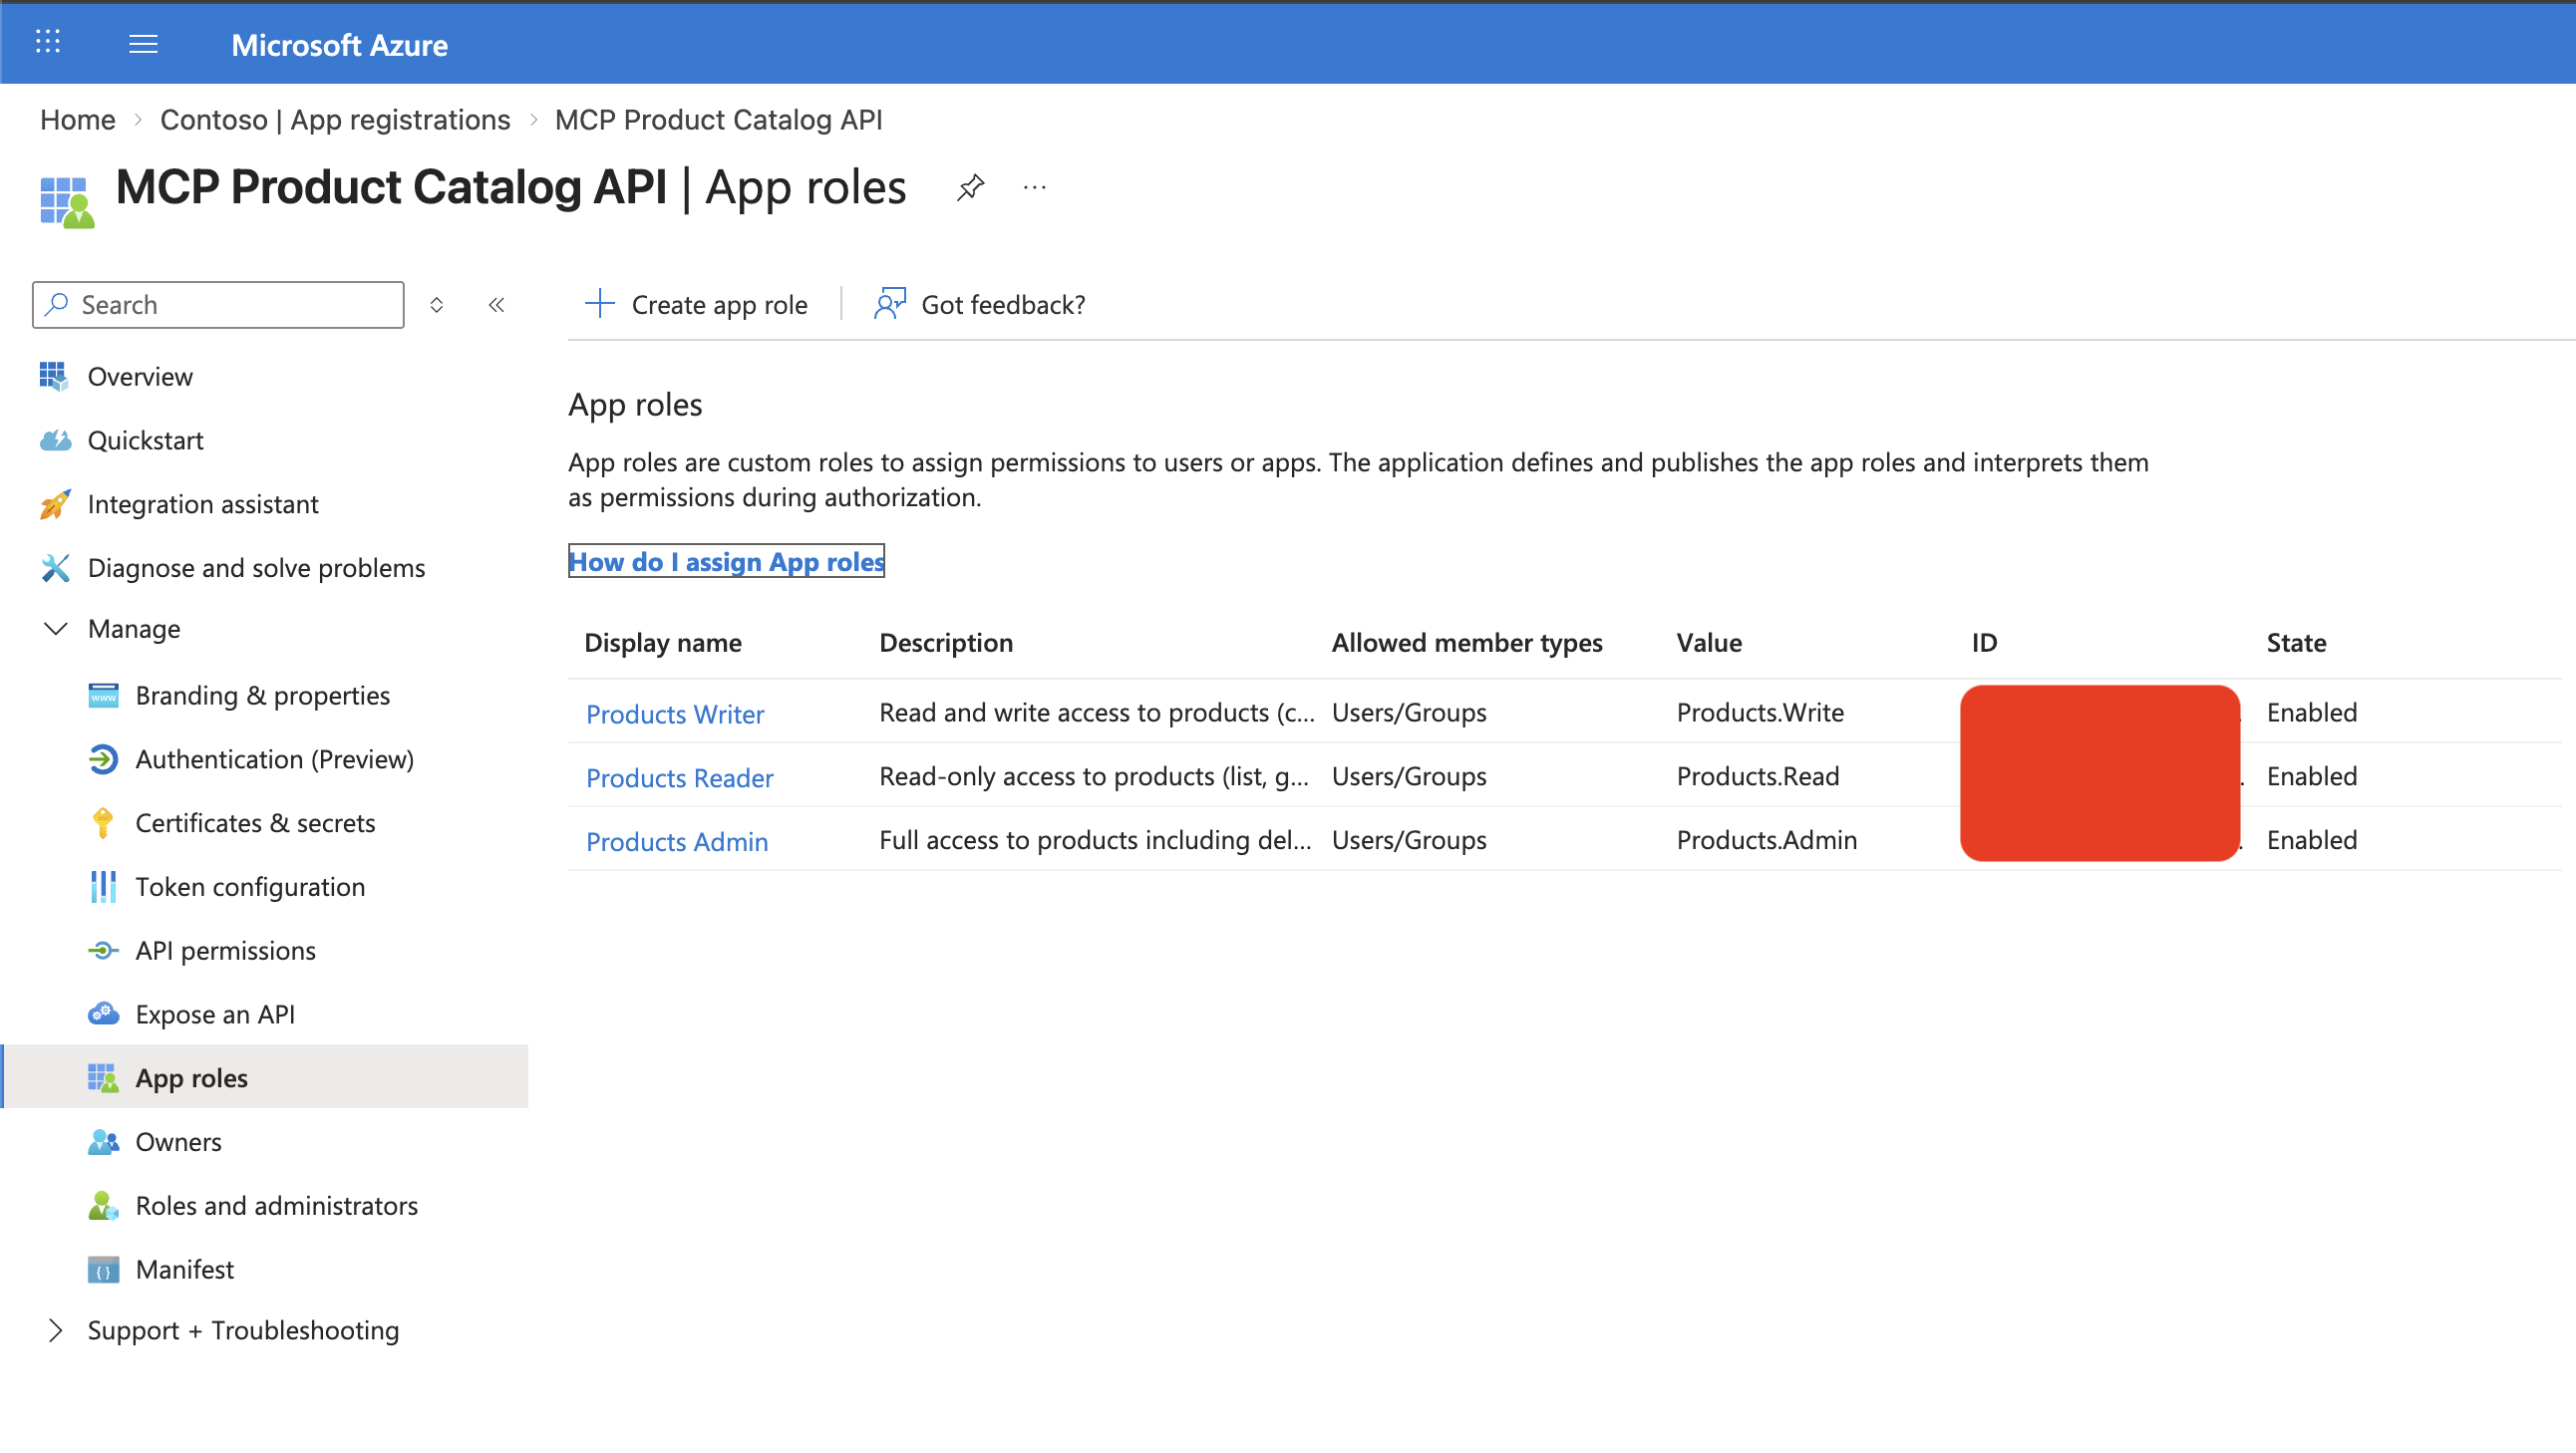
Three permission levels:
| Role | Can Do |
|---|---|
Products.Read | List, get, search products |
Products.Write | Read + create, update products |
Products.Admin | Full access including delete |
The goal: a user with Products.Read should be able to list products through Copilot Studio, but get blocked if they ask the AI to create or delete one.
Step 1: Entra ID Setup — The Foundation
All auth configuration lives in Entra ID (Azure AD). No code changes to the API itself — everything is enforced at the APIM layer.
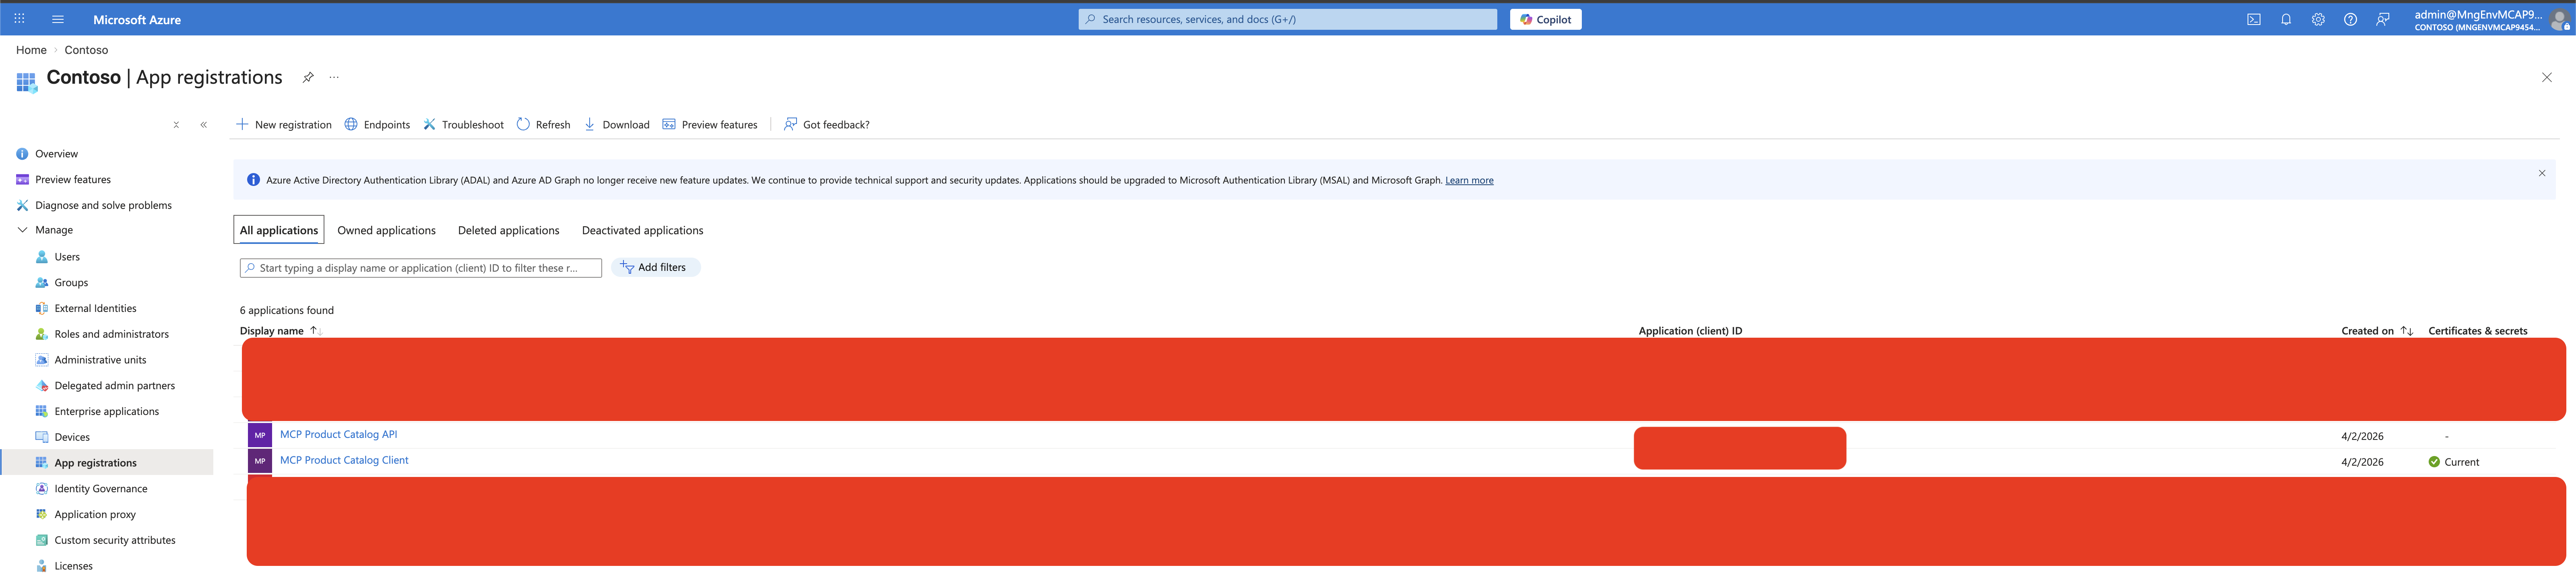
Two App Registrations
You need exactly two:
1. API App Registration (“the lock on the door”)
- Represents your API / MCP server
- Defines what permissions exist
- Sets the audience URI that tokens must target
2. Client App Registration (“the key”)
- Represents the apps that call your API (Copilot Studio, Insomnia, etc.)
- What users authenticate through to get tokens
- Has a Client ID + Secret used in OAuth flows
Think of it this way: your house key (client) and your house lock (API) are separate things. You can have multiple keys without changing the lock, and you can revoke one key without affecting the others.
Both app registrations in the Azure Portal — the API and the Client:
Creating the API App
# Create the app registration
API_APP_ID=$(az ad app create \
  --display-name "MCP Product Catalog API" \
  --sign-in-audience "AzureADMyOrg" \
  --query appId -o tsv)

# Set the identifier URI (this becomes the "audience" in tokens)
az ad app update --id "$API_APP_ID" --identifier-uris "api://$API_APP_ID"
The identifier URI api://{appId} is what Entra ID stamps into the aud claim of every token. APIM checks this to ensure the token was meant for your API, not someone else’s.
Defining App Roles
App roles define what permissions exist. They show up in the roles claim of the token:
Three app roles defined on the API app registration — Reader, Writer, and Admin:
az ad app update --id "$API_APP_ID" --app-roles '[
{
"allowedMemberTypes": ["User", "Application"],
"displayName": "Products Reader",
"value": "Products.Read",
"isEnabled": true
},
{
"allowedMemberTypes": ["User", "Application"],
"displayName": "Products Writer",
"value": "Products.Write",
"isEnabled": true
},
{
"allowedMemberTypes": ["User", "Application"],
"displayName": "Products Admin",
"value": "Products.Admin",
"isEnabled": true
}
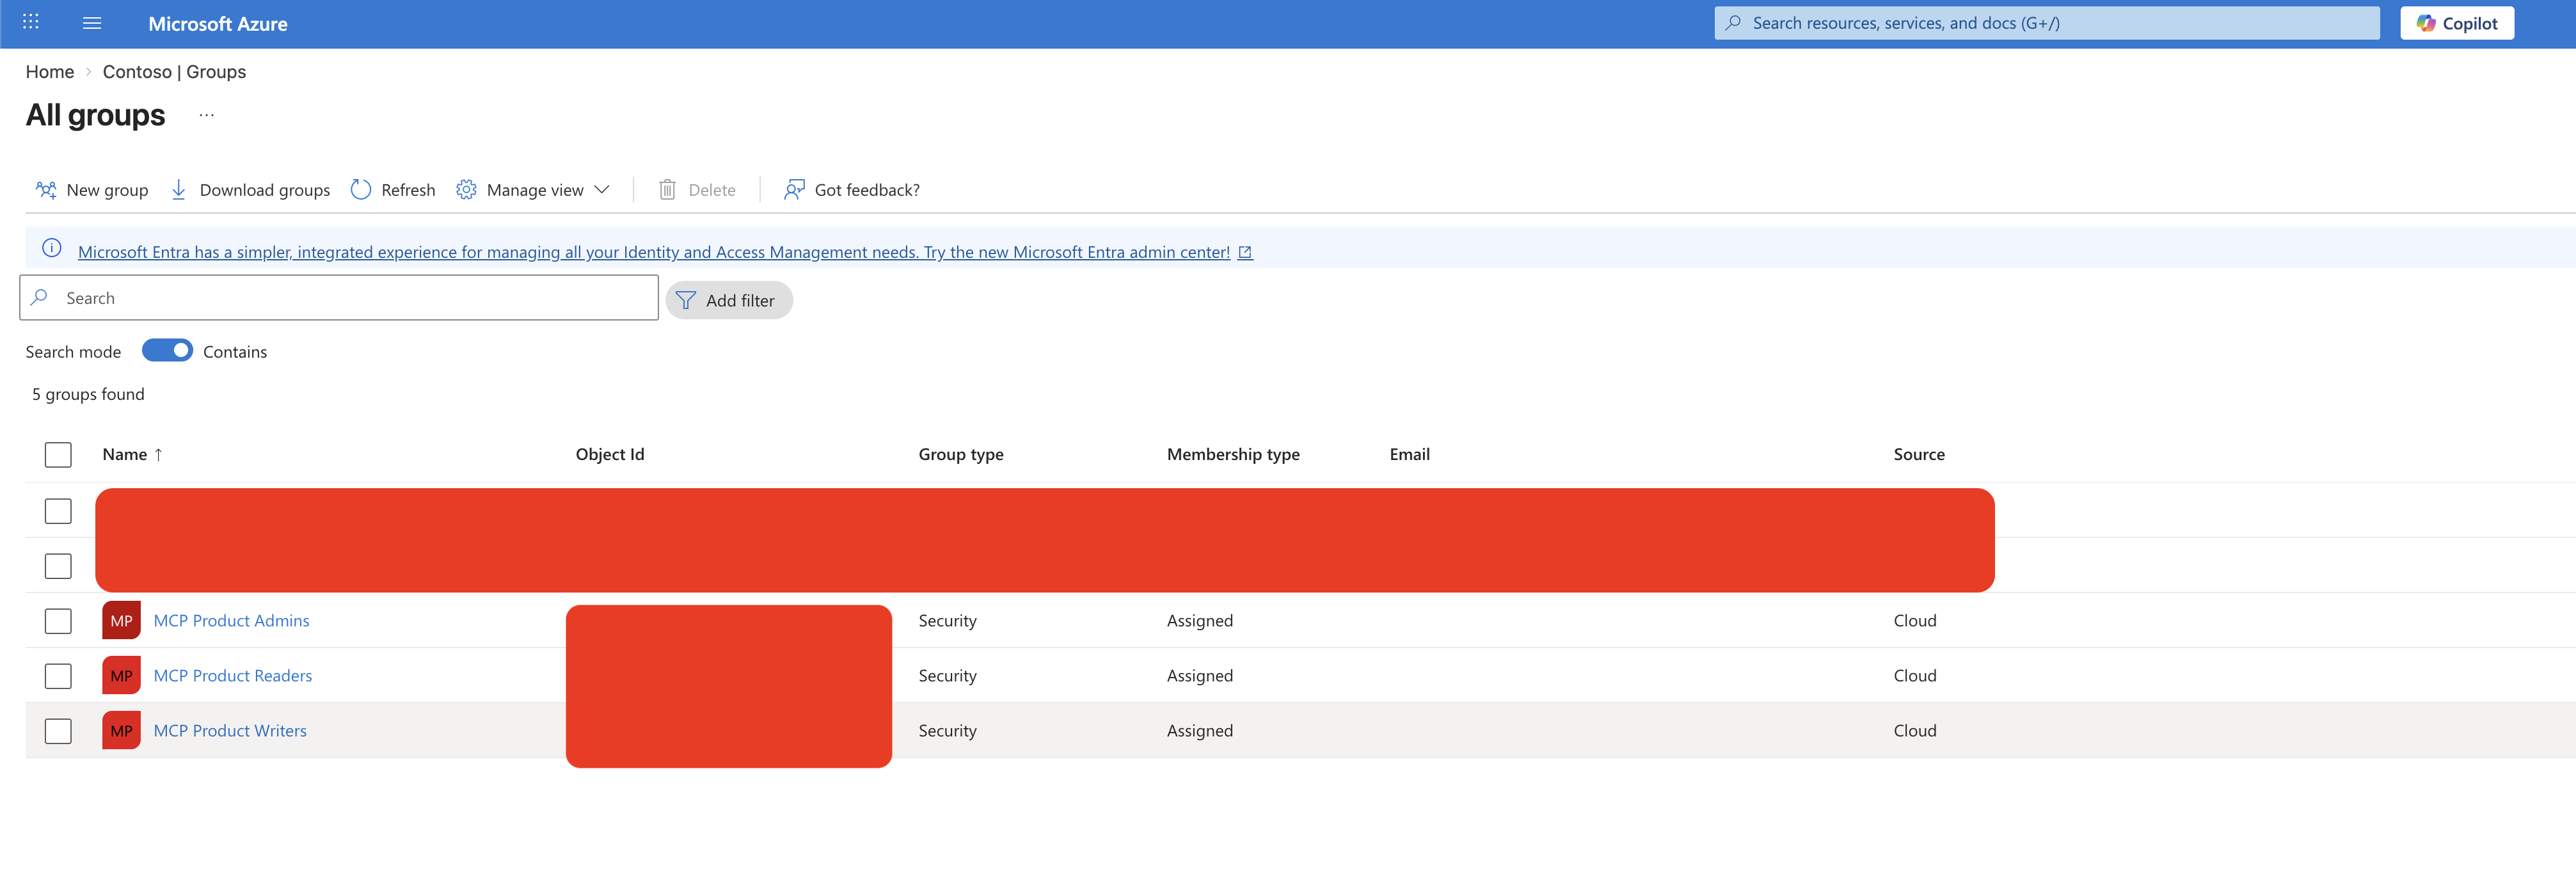
]'Creating Entra ID Groups
Users get permissions through group membership:
| Group | Role | Who Gets In |
|---|---|---|
| MCP Product Readers | Products.Read | Dashboard users, viewers |
| MCP Product Writers | Products.Write | Content editors, inventory managers |
| MCP Product Admins | Products.Admin | Operations team |
When a user signs in, Entra ID resolves their group membership → maps to app roles → includes them in the roles claim of the token. The user never sees this — it just works.
Entra ID security groups that map to app roles:
Creating the Client App
CLIENT_APP_ID=$(az ad app create \
  --display-name "MCP Product Catalog Client" \
  --sign-in-audience "AzureADMyOrg" \
  --public-client-redirect-uris "http://localhost" \
  --query appId -o tsv)
The client app needs redirect URIs registered for each tool that will use it:
Additionally, the API app exposes delegated permission scopes that the client app requests:
Delegated scopes exposed by the API app (Expose an API blade):
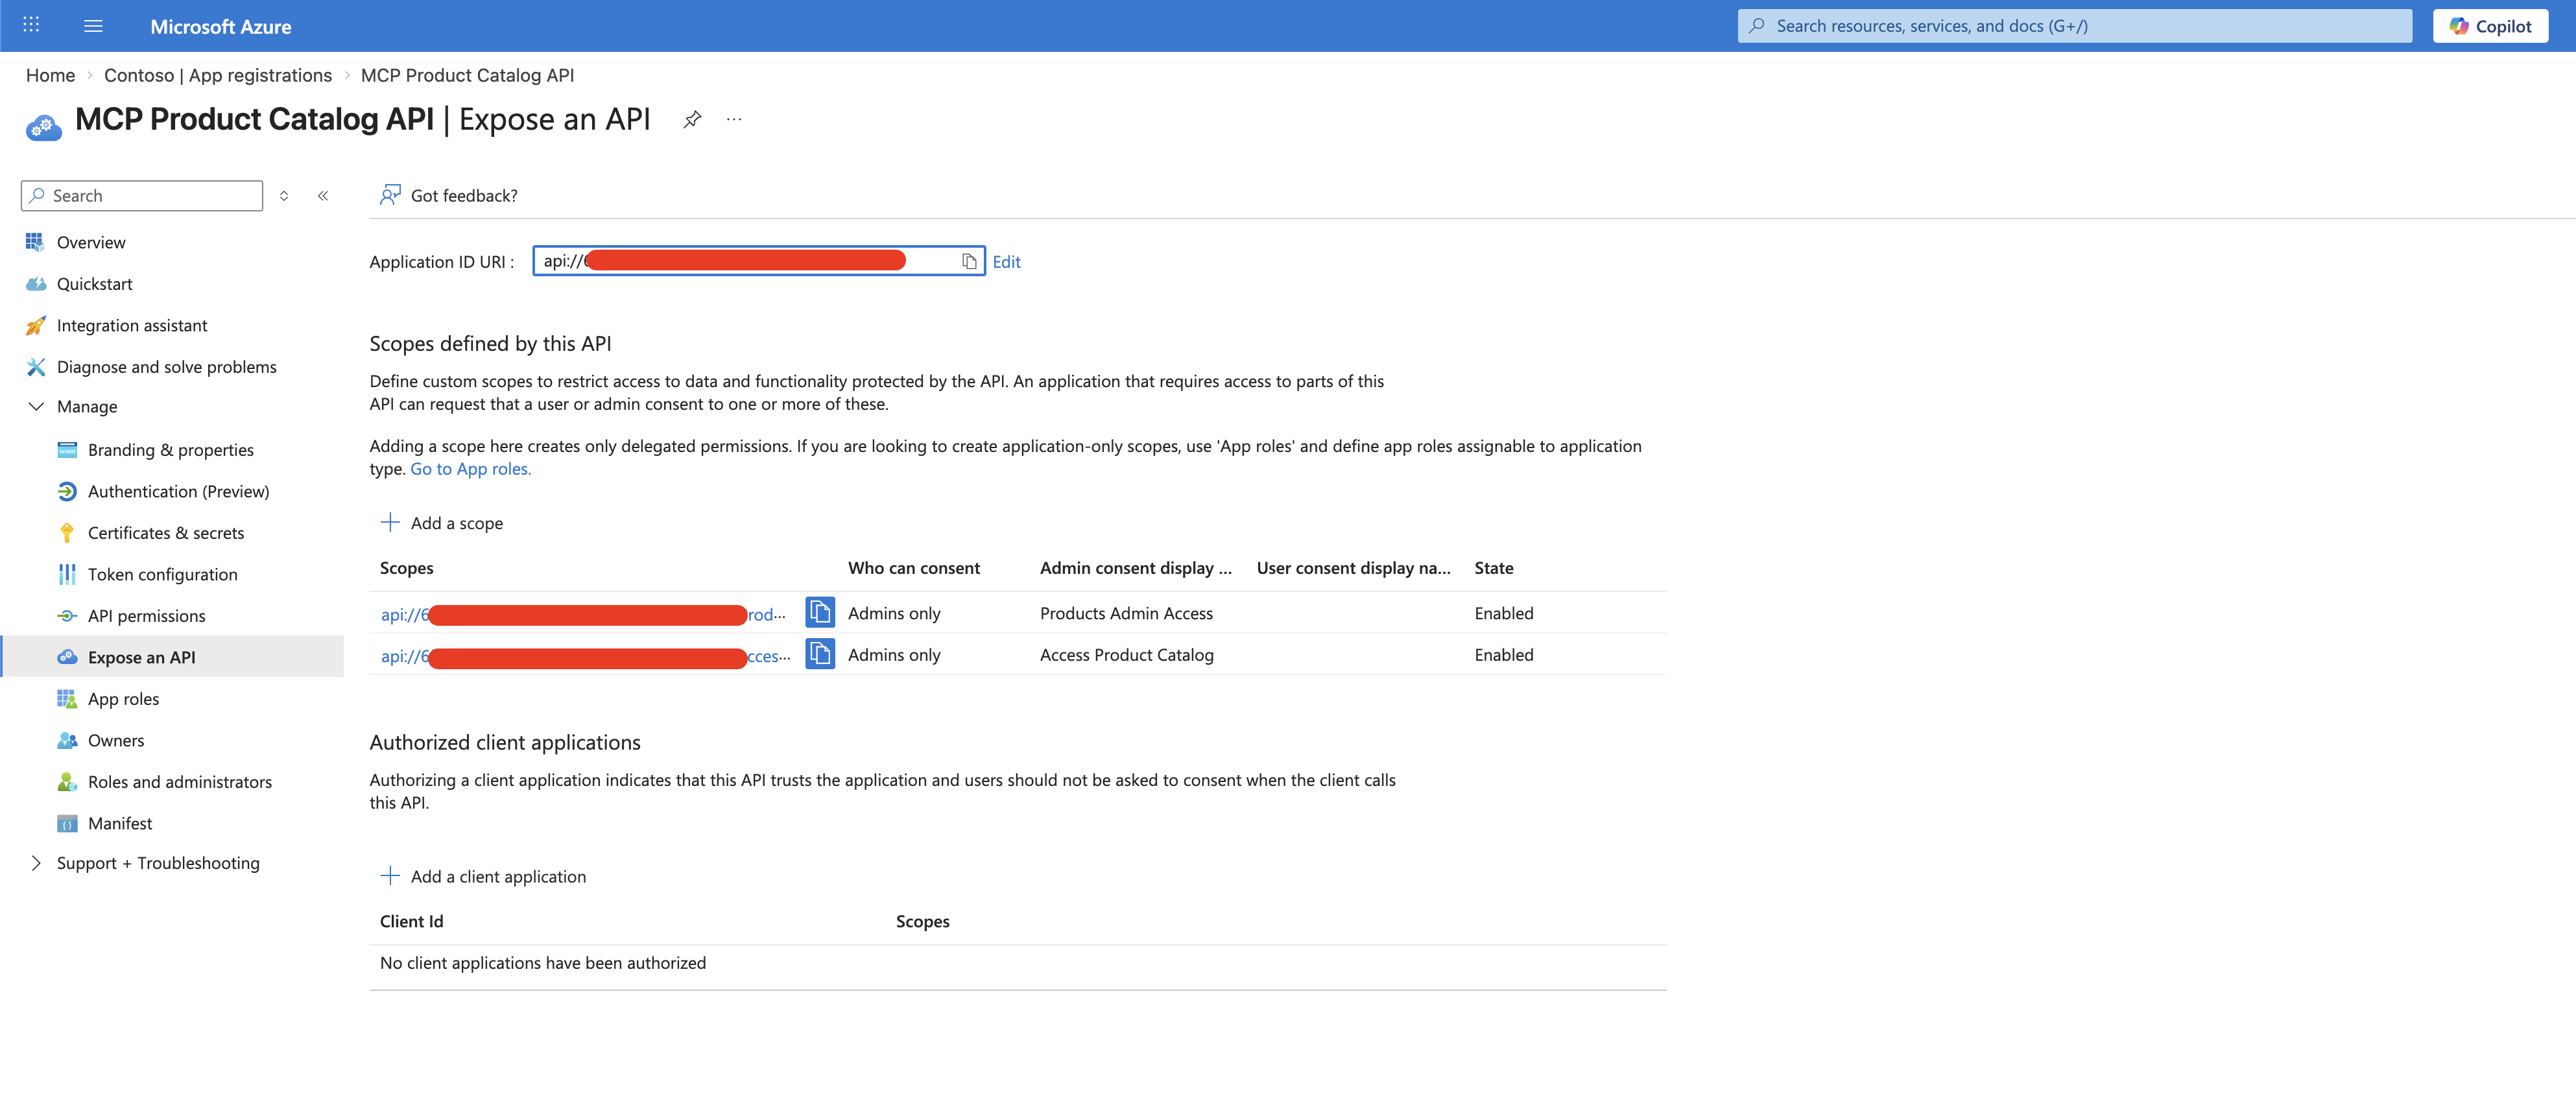
The client app’s API permissions — both delegated scopes and application permissions granted with admin consent:
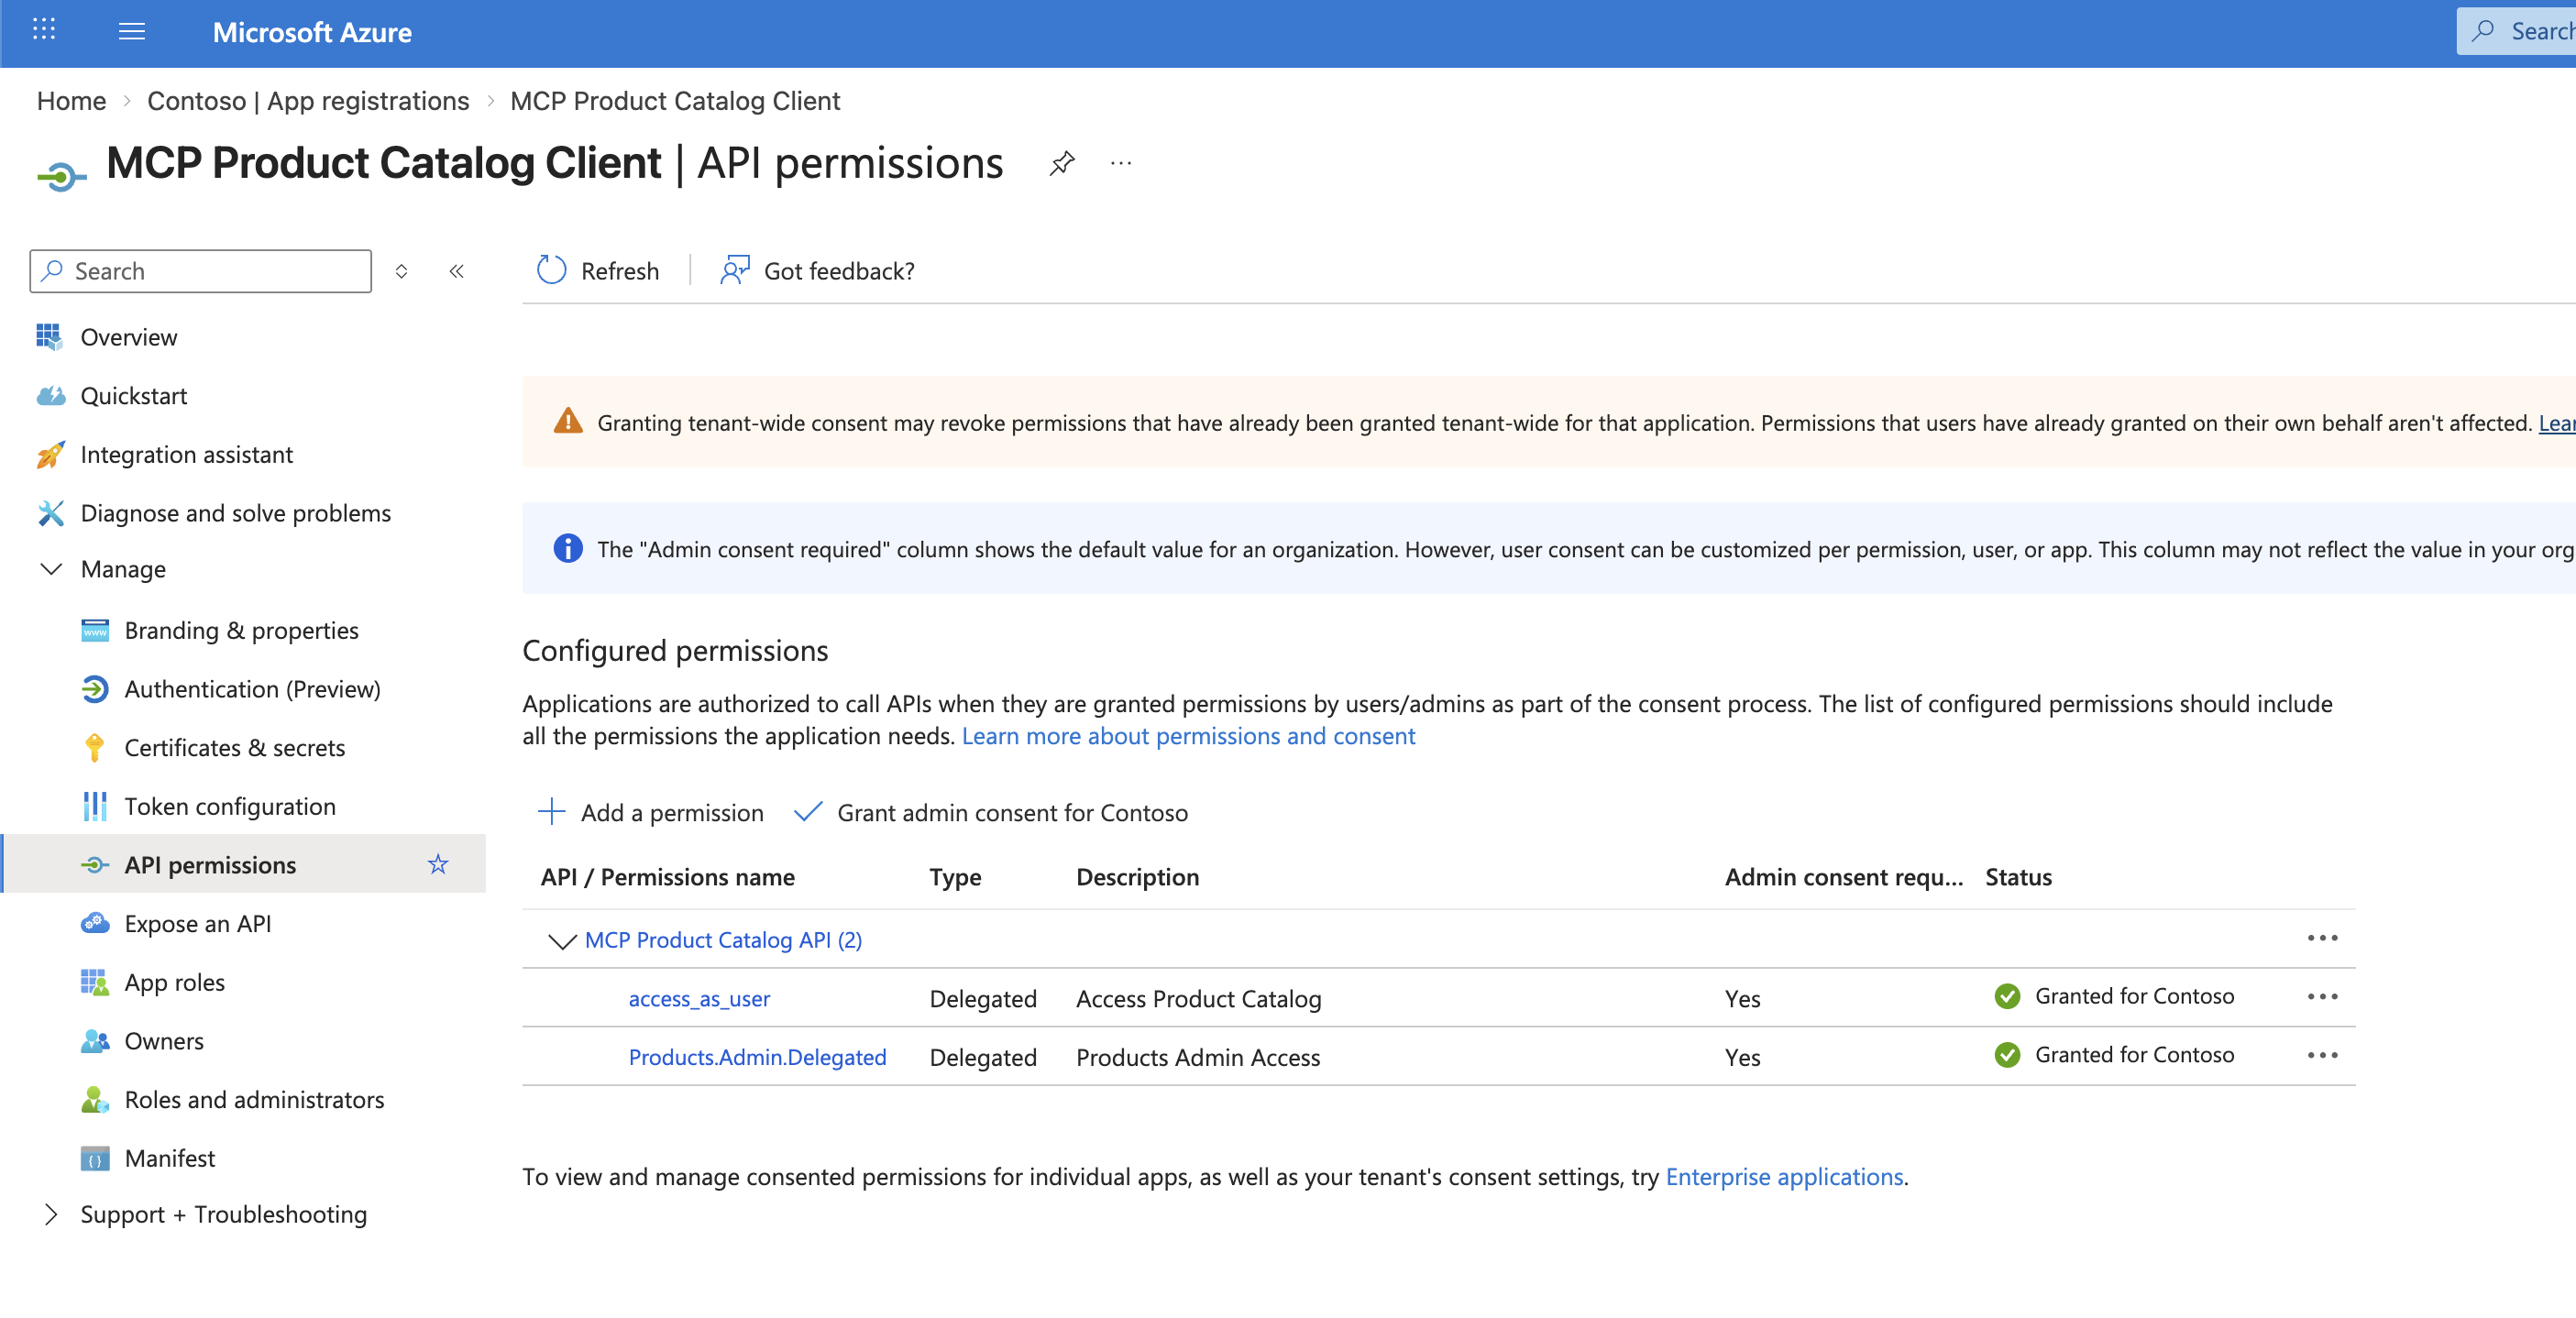
Notice the Products.Admin application permission granted to the client app. This is easy to overlook but essential — here’s why:
Why does the client app need an application-level app role?
The delegated scopes (
Access Product Catalog,Products Admin Access) control what the client app can ask for on behalf of a user. But Entra ID also requires that the client app itself has at least one application permission (app role) assigned to the API. Without this, the Power Automate connector behind Copilot Studio cannot obtain tokens at all — token requests will fail silently or return authorization errors.Think of it this way: delegated scopes say “this app can act on behalf of users”, while the application permission says “this app is authorized to talk to this API in the first place.”
The specific role you assign (
Products.AdminvsProducts.Read) to the client app doesn’t determine what individual users can do — that’s controlled by the user’s own group-based role assignments. The client app role is a gateway requirement that proves the app registration is authorized to interact with the API registration.
| Tool | Redirect URI |
|---|---|
| Copilot Studio | https://global.consent.azure-apim.net/redirect/{your-connector-id} |
| Insomnia | https://app.insomnia.rest/oauth/redirect |
Pro tip: When you see
AADSTS50011: redirect URI mismatch, just copy the URI from the error message and add it to your app registration. Each client has its own URI.
Step 2: APIM Policies — Where the Magic Happens
This is where it gets interesting. APIM has two separate entry points, and they need completely different authorization strategies.
REST API: The Easy Part
REST API requests use different HTTP methods and paths:
GET    /api/products         → listProducts
POST   /api/products         → createProduct
DELETE /api/products/:id     → deleteProduct
APIM can match each request to a specific operation, so you can apply per-operation policies:
APIM API-level policy — validates the JWT for all operations:
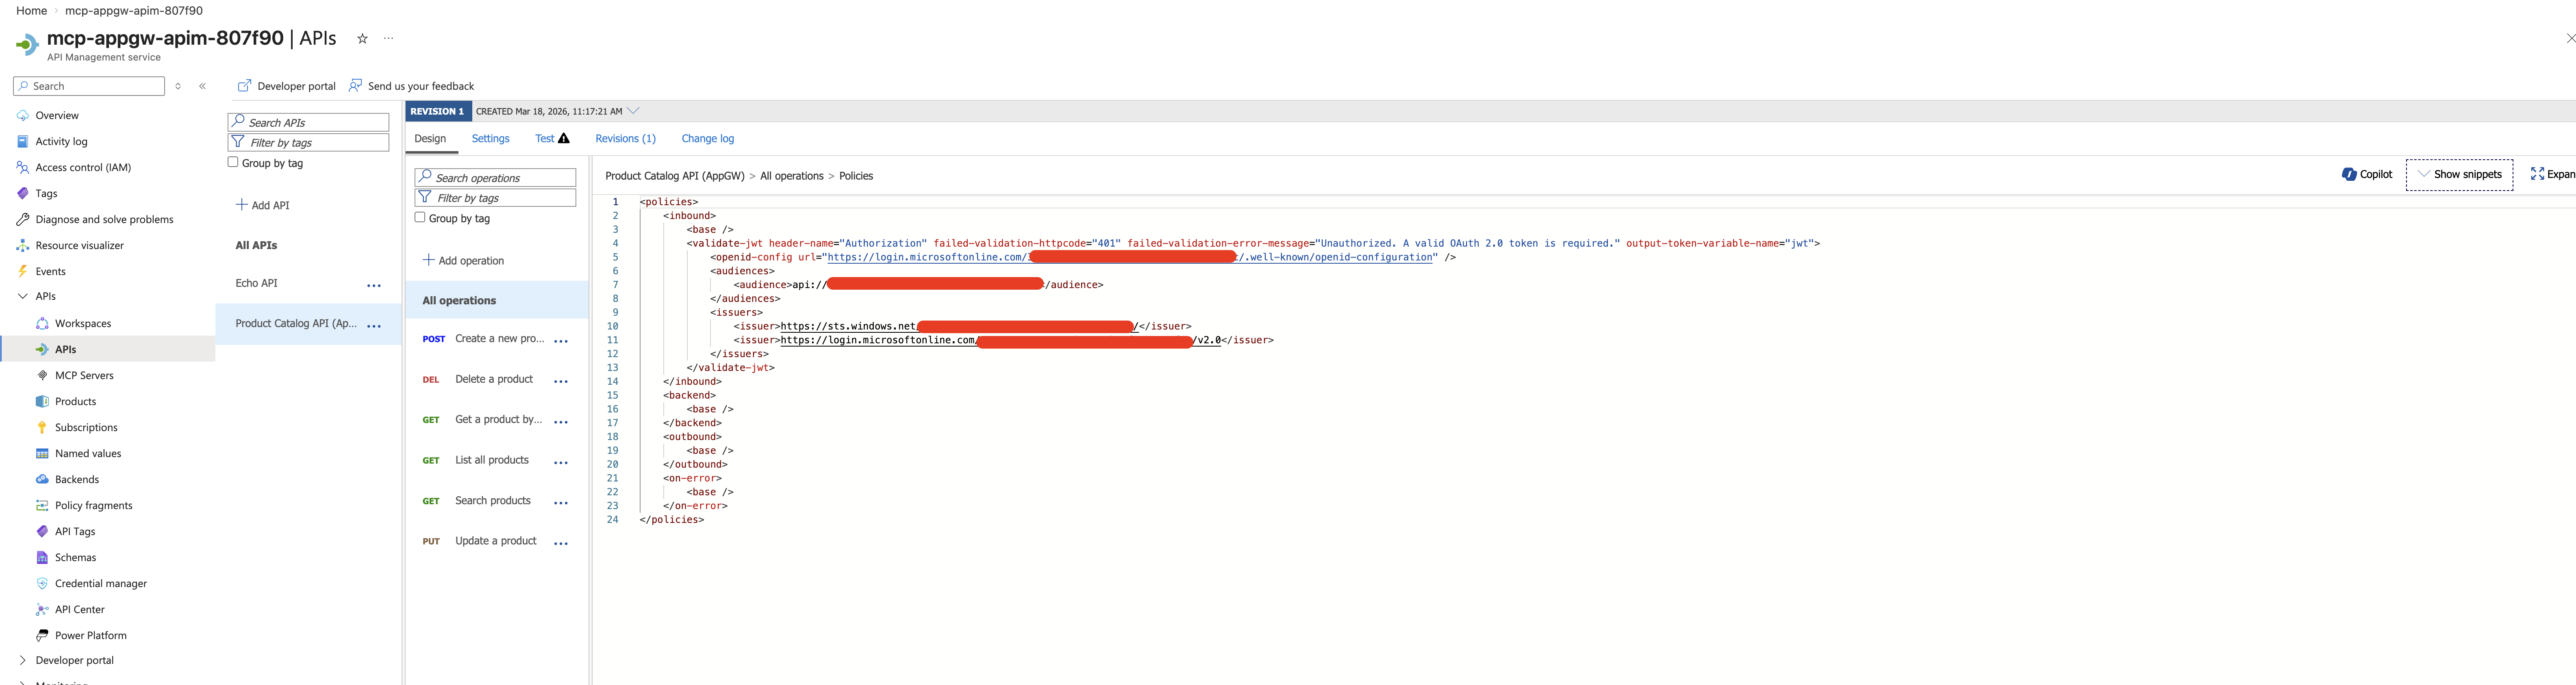
API-level policy — validates the token for all operations:
<validate-jwt header-name="Authorization" failed-validation-httpcode="401"
    failed-validation-error-message="Unauthorized."
    output-token-variable-name="jwt">
    <openid-config url="https://login.microsoftonline.com/{tenant-id}/.well-known/openid-configuration" />
    <audiences>
        <audience>api://{api-app-id}</audience>
    </audiences>
    <issuers>
        <issuer>https://sts.windows.net/{tenant-id}/</issuer>
        <issuer>https://login.microsoftonline.com/{tenant-id}/v2.0</issuer>
    </issuers>
</validate-jwt>
Operation-level policies — check roles per operation. For write operations:
<choose>
    <when condition="@{
        var jwt = (Jwt)context.Variables["jwt"];
        var roles = jwt.Claims.ContainsKey("roles") ? jwt.Claims["roles"] : new string[0];
        return !roles.Contains("Products.Write") && !roles.Contains("Products.Admin");
    }">
        <return-response>
            <set-status code="403" reason="Forbidden" />
            <set-body>{"error": "Products.Write or Products.Admin role required"}</set-body>
        </return-response>
    </when>
</choose>
This works great. A Test Reader user calling POST /api/products gets 403. ✅
MCP Server: The Hard Part
Here’s the gotcha that took hours to figure out. All MCP traffic goes through a single endpoint:
POST /mcpEvery tool call — list, create, update, delete — hits the same endpoint. The tool name is buried inside the JSON-RPC request body:
{
  "jsonrpc": "2.0",
  "method": "tools/call",
  "params": {
    "name": "createProduct",      ← the tool name is HERE
    "arguments": { ... }
  }
}
This means:
- APIM sees every MCP request as the same operation
- Per-operation policies never fire
- A user with only
Products.Readcan callcreateProductthrough MCP without being stopped
I like to think of it as a building with two doors:
Door 1 (REST API): Each operation has its own door with a guard who checks your badge.
Door 2 (MCP): One door for everything. The guard checks if your badge is valid, but doesn’t look at what you’re trying to do inside.

The Fix: A Smarter MCP Policy
The MCP server needs its own policy that:
- Validates the JWT (because MCP doesn’t inherit the API-level policy — more on this below)
- Reads the tool name from the JSON-RPC body
- Checks roles based on the tool being called
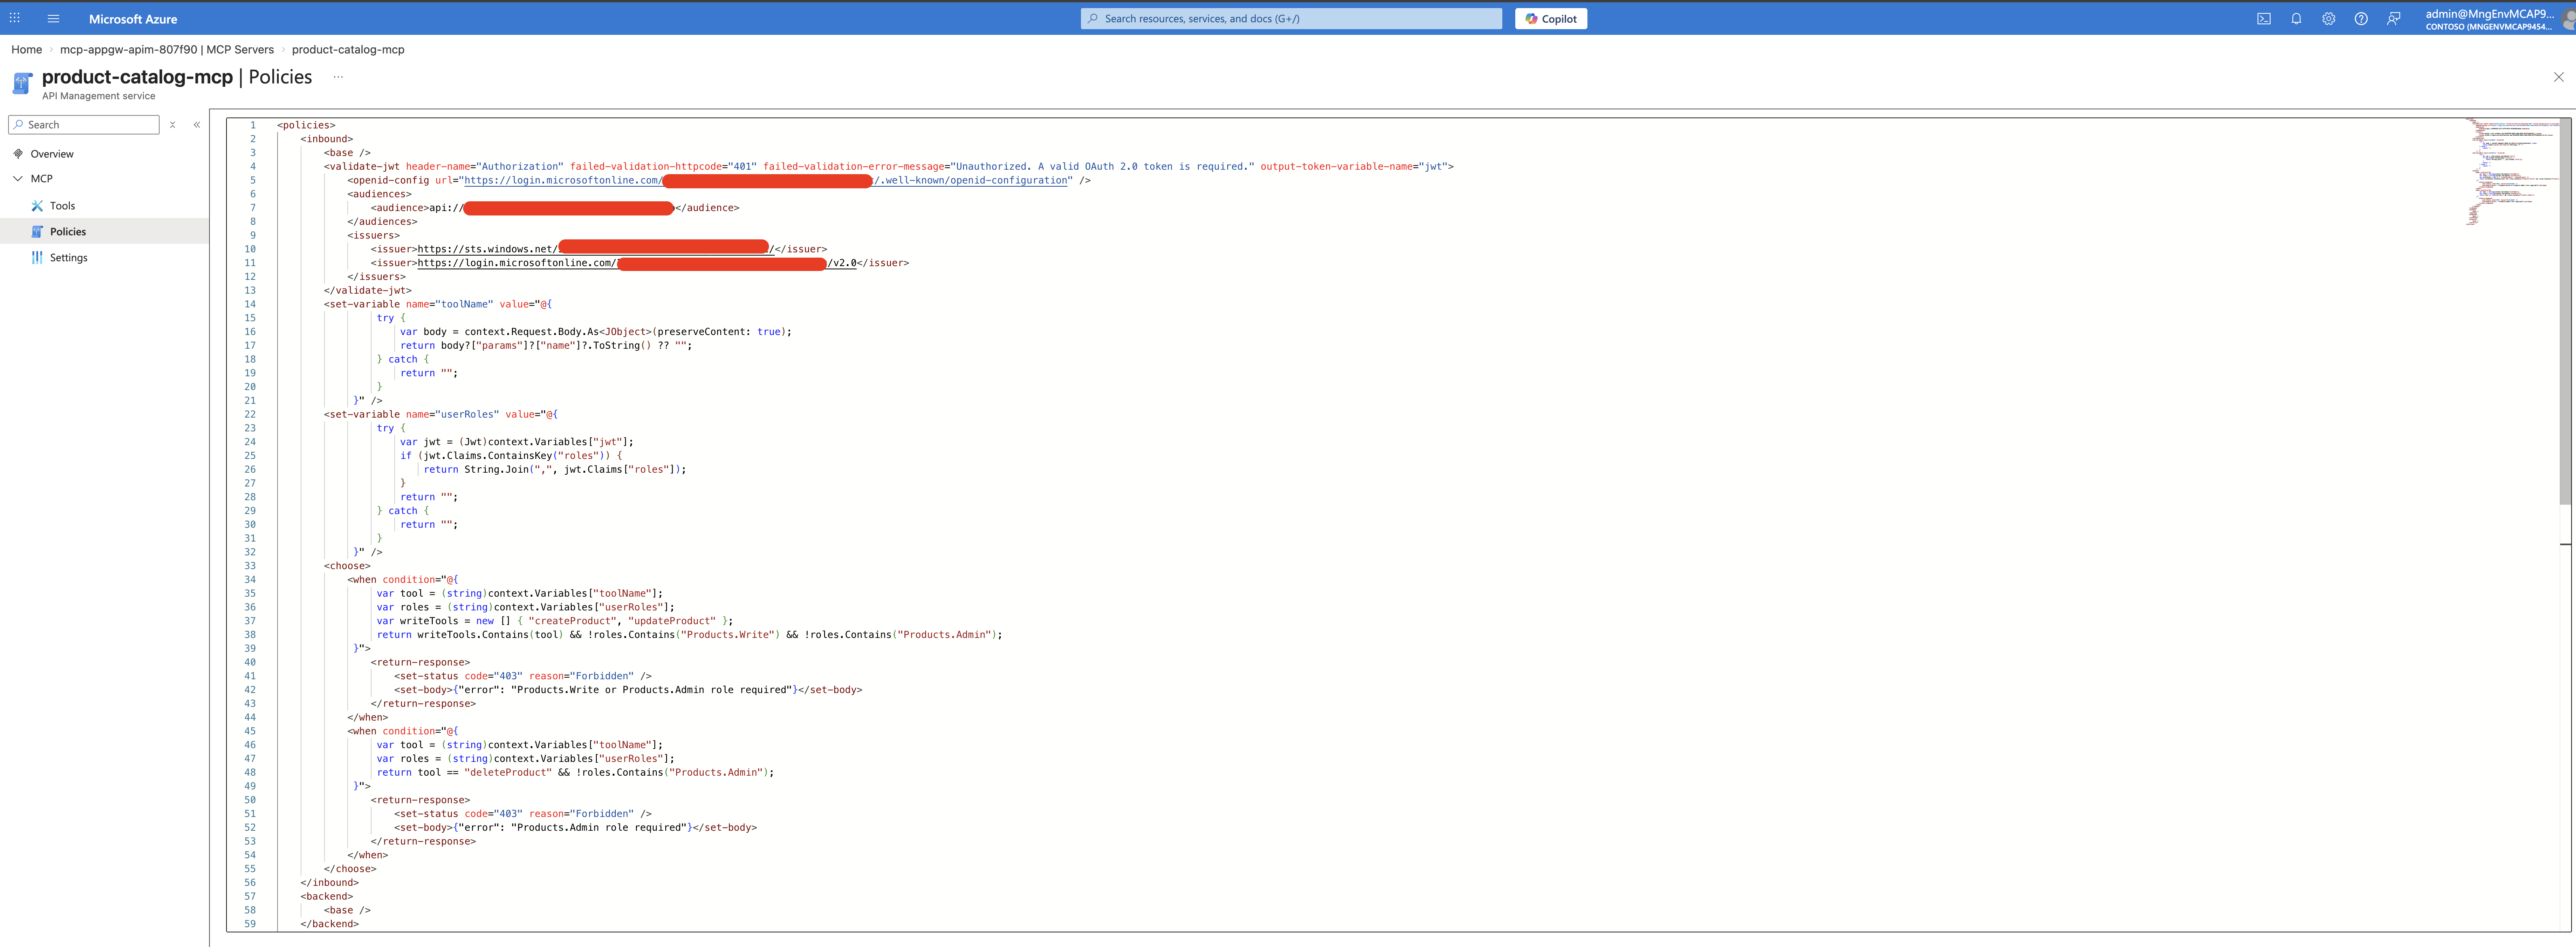
<policies>
    <inbound>
        <base />
        <!-- Step 1: Validate the JWT -->
        <validate-jwt header-name="Authorization" failed-validation-httpcode="401"
            failed-validation-error-message="Unauthorized."
            output-token-variable-name="jwt">
            <openid-config url="https://login.microsoftonline.com/{tenant-id}/.well-known/openid-configuration" />
            <audiences>
                <audience>api://{api-app-id}</audience>
            </audiences>
            <issuers>
                <issuer>https://sts.windows.net/{tenant-id}/</issuer>
                <issuer>https://login.microsoftonline.com/{tenant-id}/v2.0</issuer>
            </issuers>
        </validate-jwt>

        <!-- Step 2: Extract tool name from JSON-RPC body -->
        <set-variable name="toolName"
            value="@{
                try {
                    var body = context.Request.Body.As<JObject>(preserveContent: true);
                    return body?["params"]?["name"]?.ToString() ?? "";
                } catch {
                    return "";
                }
            }" />

        <!-- Step 3: Extract user roles from the JWT -->
        <set-variable name="userRoles"
            value="@{
                try {
                    var jwt = (Jwt)context.Variables["jwt"];
                    if (jwt.Claims.ContainsKey("roles")) {
                        return String.Join(",", jwt.Claims["roles"]);
                    }
                    return "";
                } catch {
                    return "";
                }
            }" />

        <!-- Step 4: Enforce role-based access per tool -->
        <choose>
            <when condition="@{
                var tool = (string)context.Variables["toolName"];
                var roles = (string)context.Variables["userRoles"];
                var writeTools = new [] { "createProduct", "updateProduct" };
                return writeTools.Contains(tool)
                    && !roles.Contains("Products.Write")
                    && !roles.Contains("Products.Admin");
            }">
                <return-response>
                    <set-status code="403" reason="Forbidden" />
                    <set-body>{"error": "Products.Write or Products.Admin role required"}</set-body>
                </return-response>
            </when>
            <when condition="@{
                var tool = (string)context.Variables["toolName"];
                var roles = (string)context.Variables["userRoles"];
                return tool == "deleteProduct"
                    && !roles.Contains("Products.Admin");
            }">
                <return-response>
                    <set-status code="403" reason="Forbidden" />
                    <set-body>{"error": "Products.Admin role required"}</set-body>
                </return-response>
            </when>
        </choose>
    </inbound>
    <backend><base /></backend>
    <outbound><base /></outbound>
    <on-error><base /></on-error>
</policies>
After applying this, a read-only user trying to create a product through Copilot Studio gets blocked. ✅
See it in action — Admin user with full access in Copilot Studio:
The full MCP server policy in the Azure Portal — handling JWT validation, tool name extraction, and role-based access in one place:
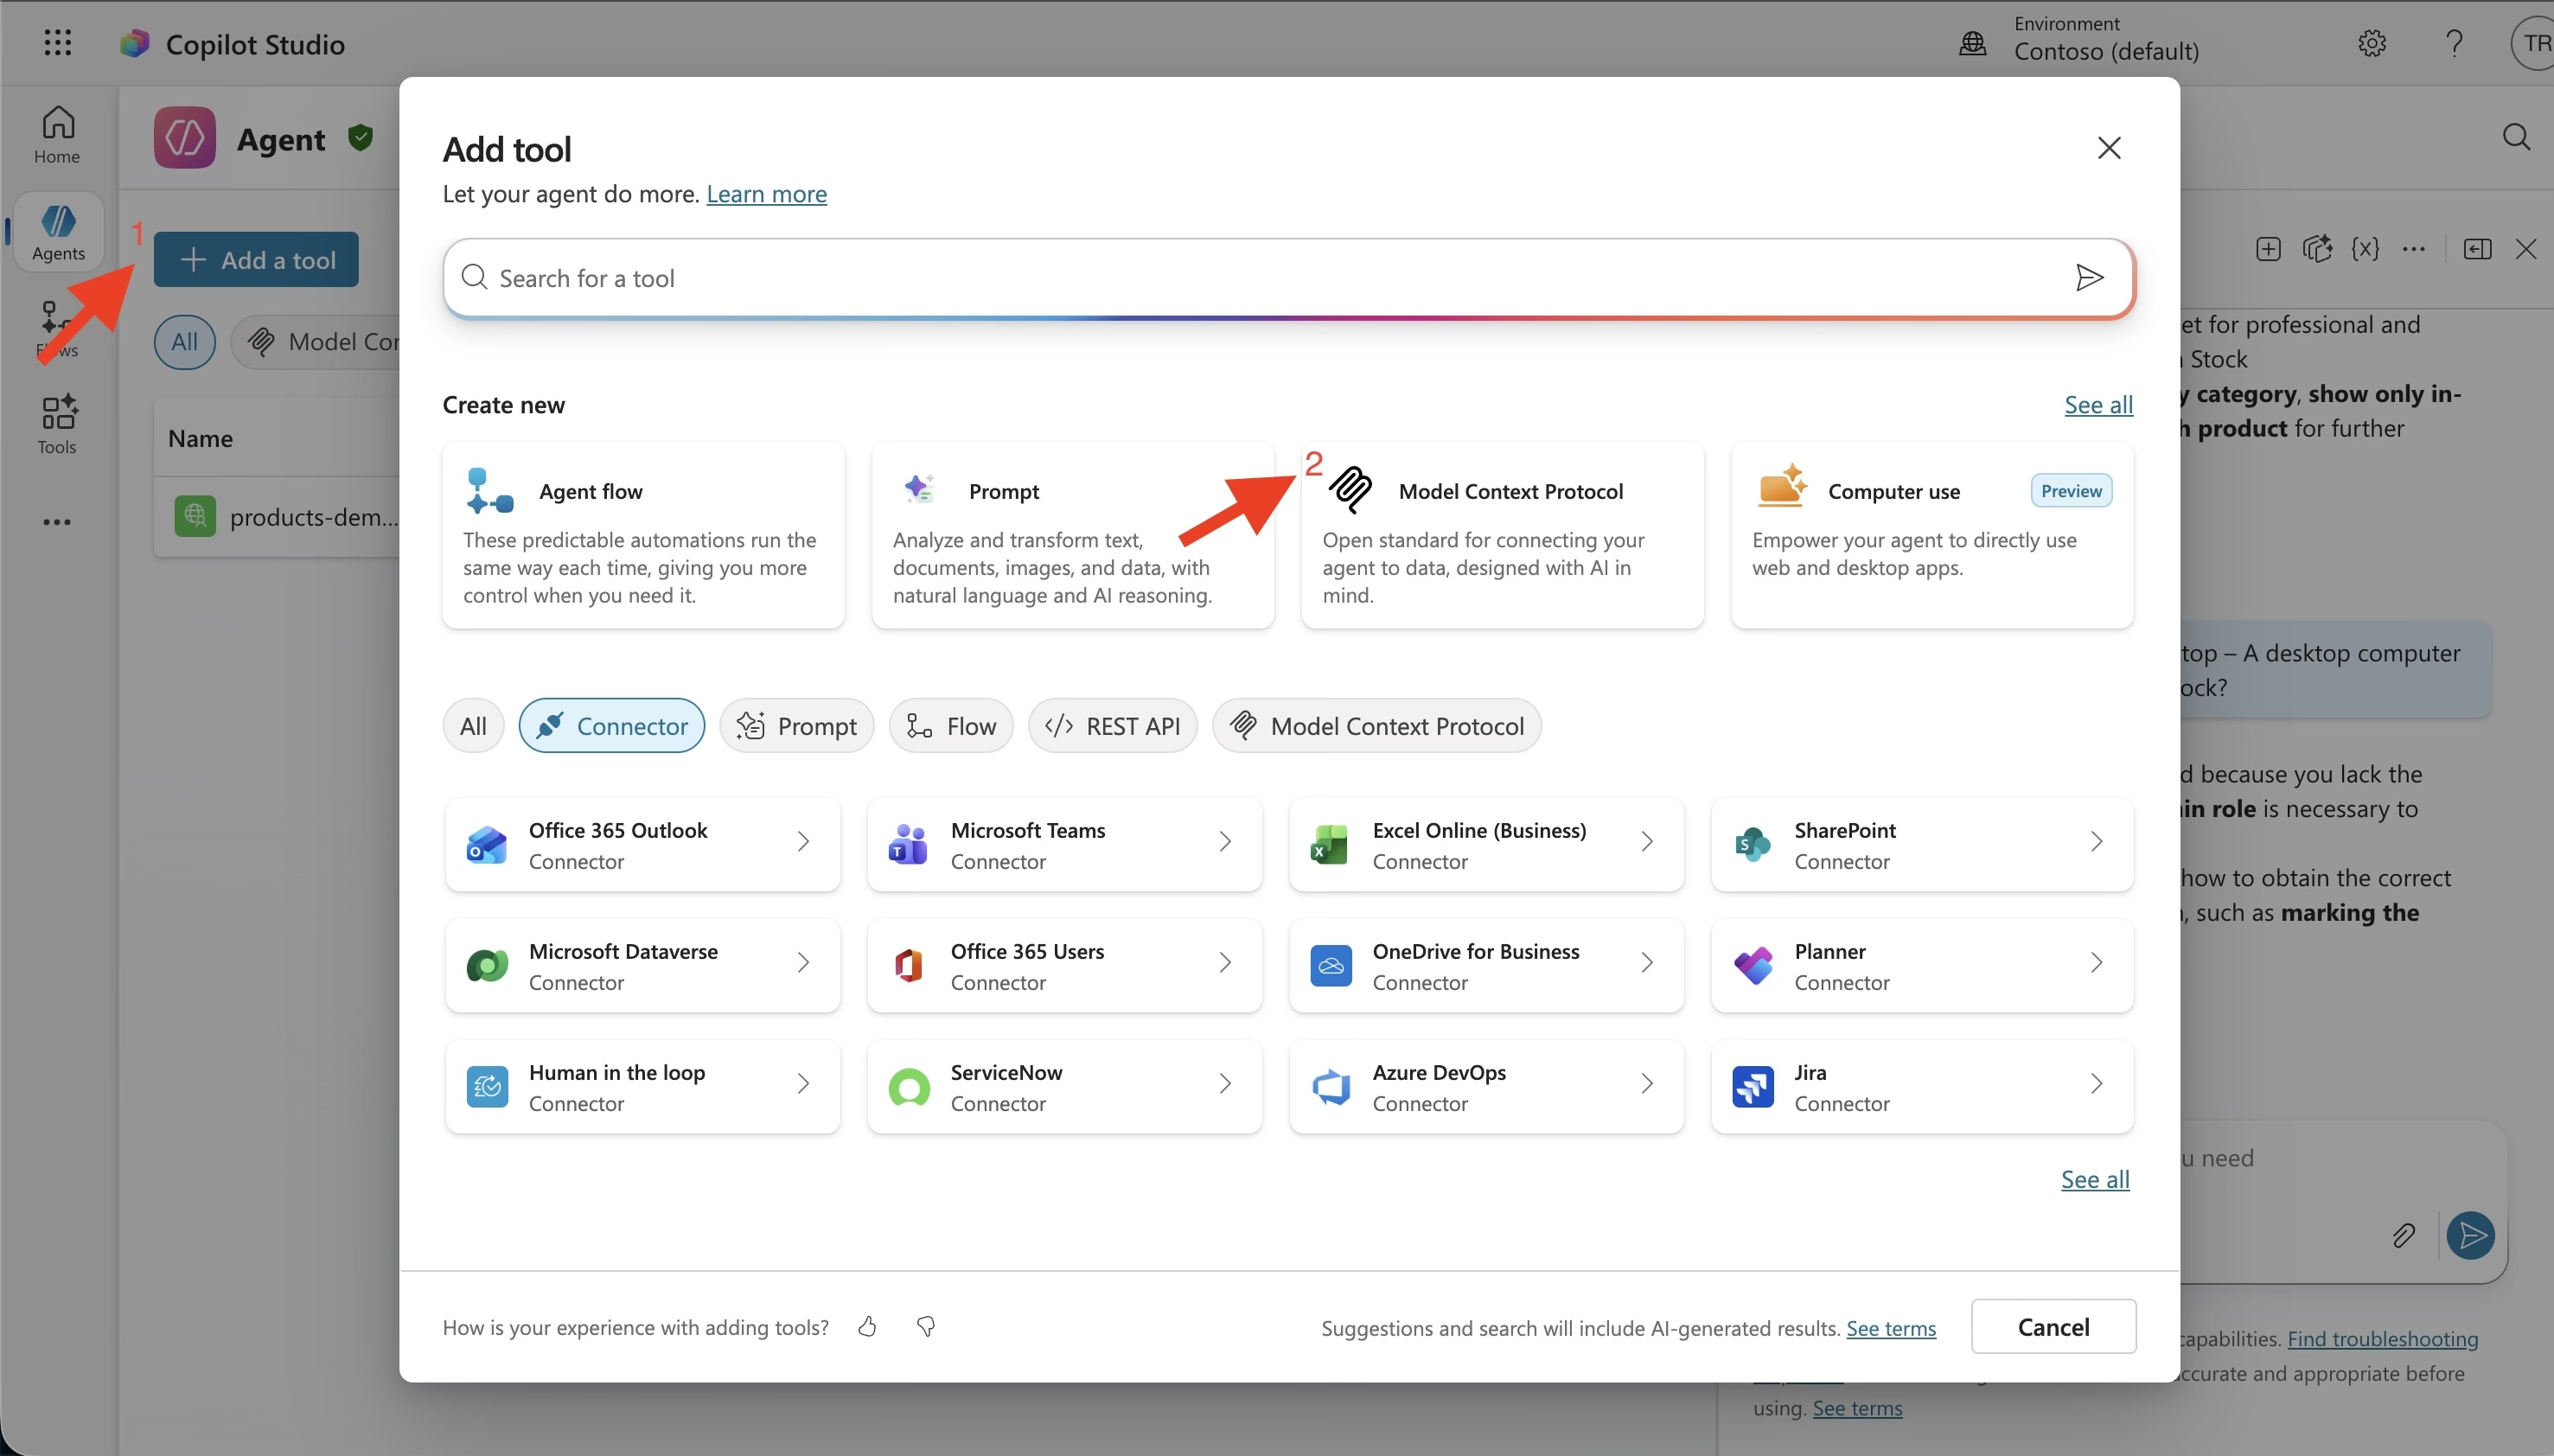
Step 3: Connecting Copilot Studio
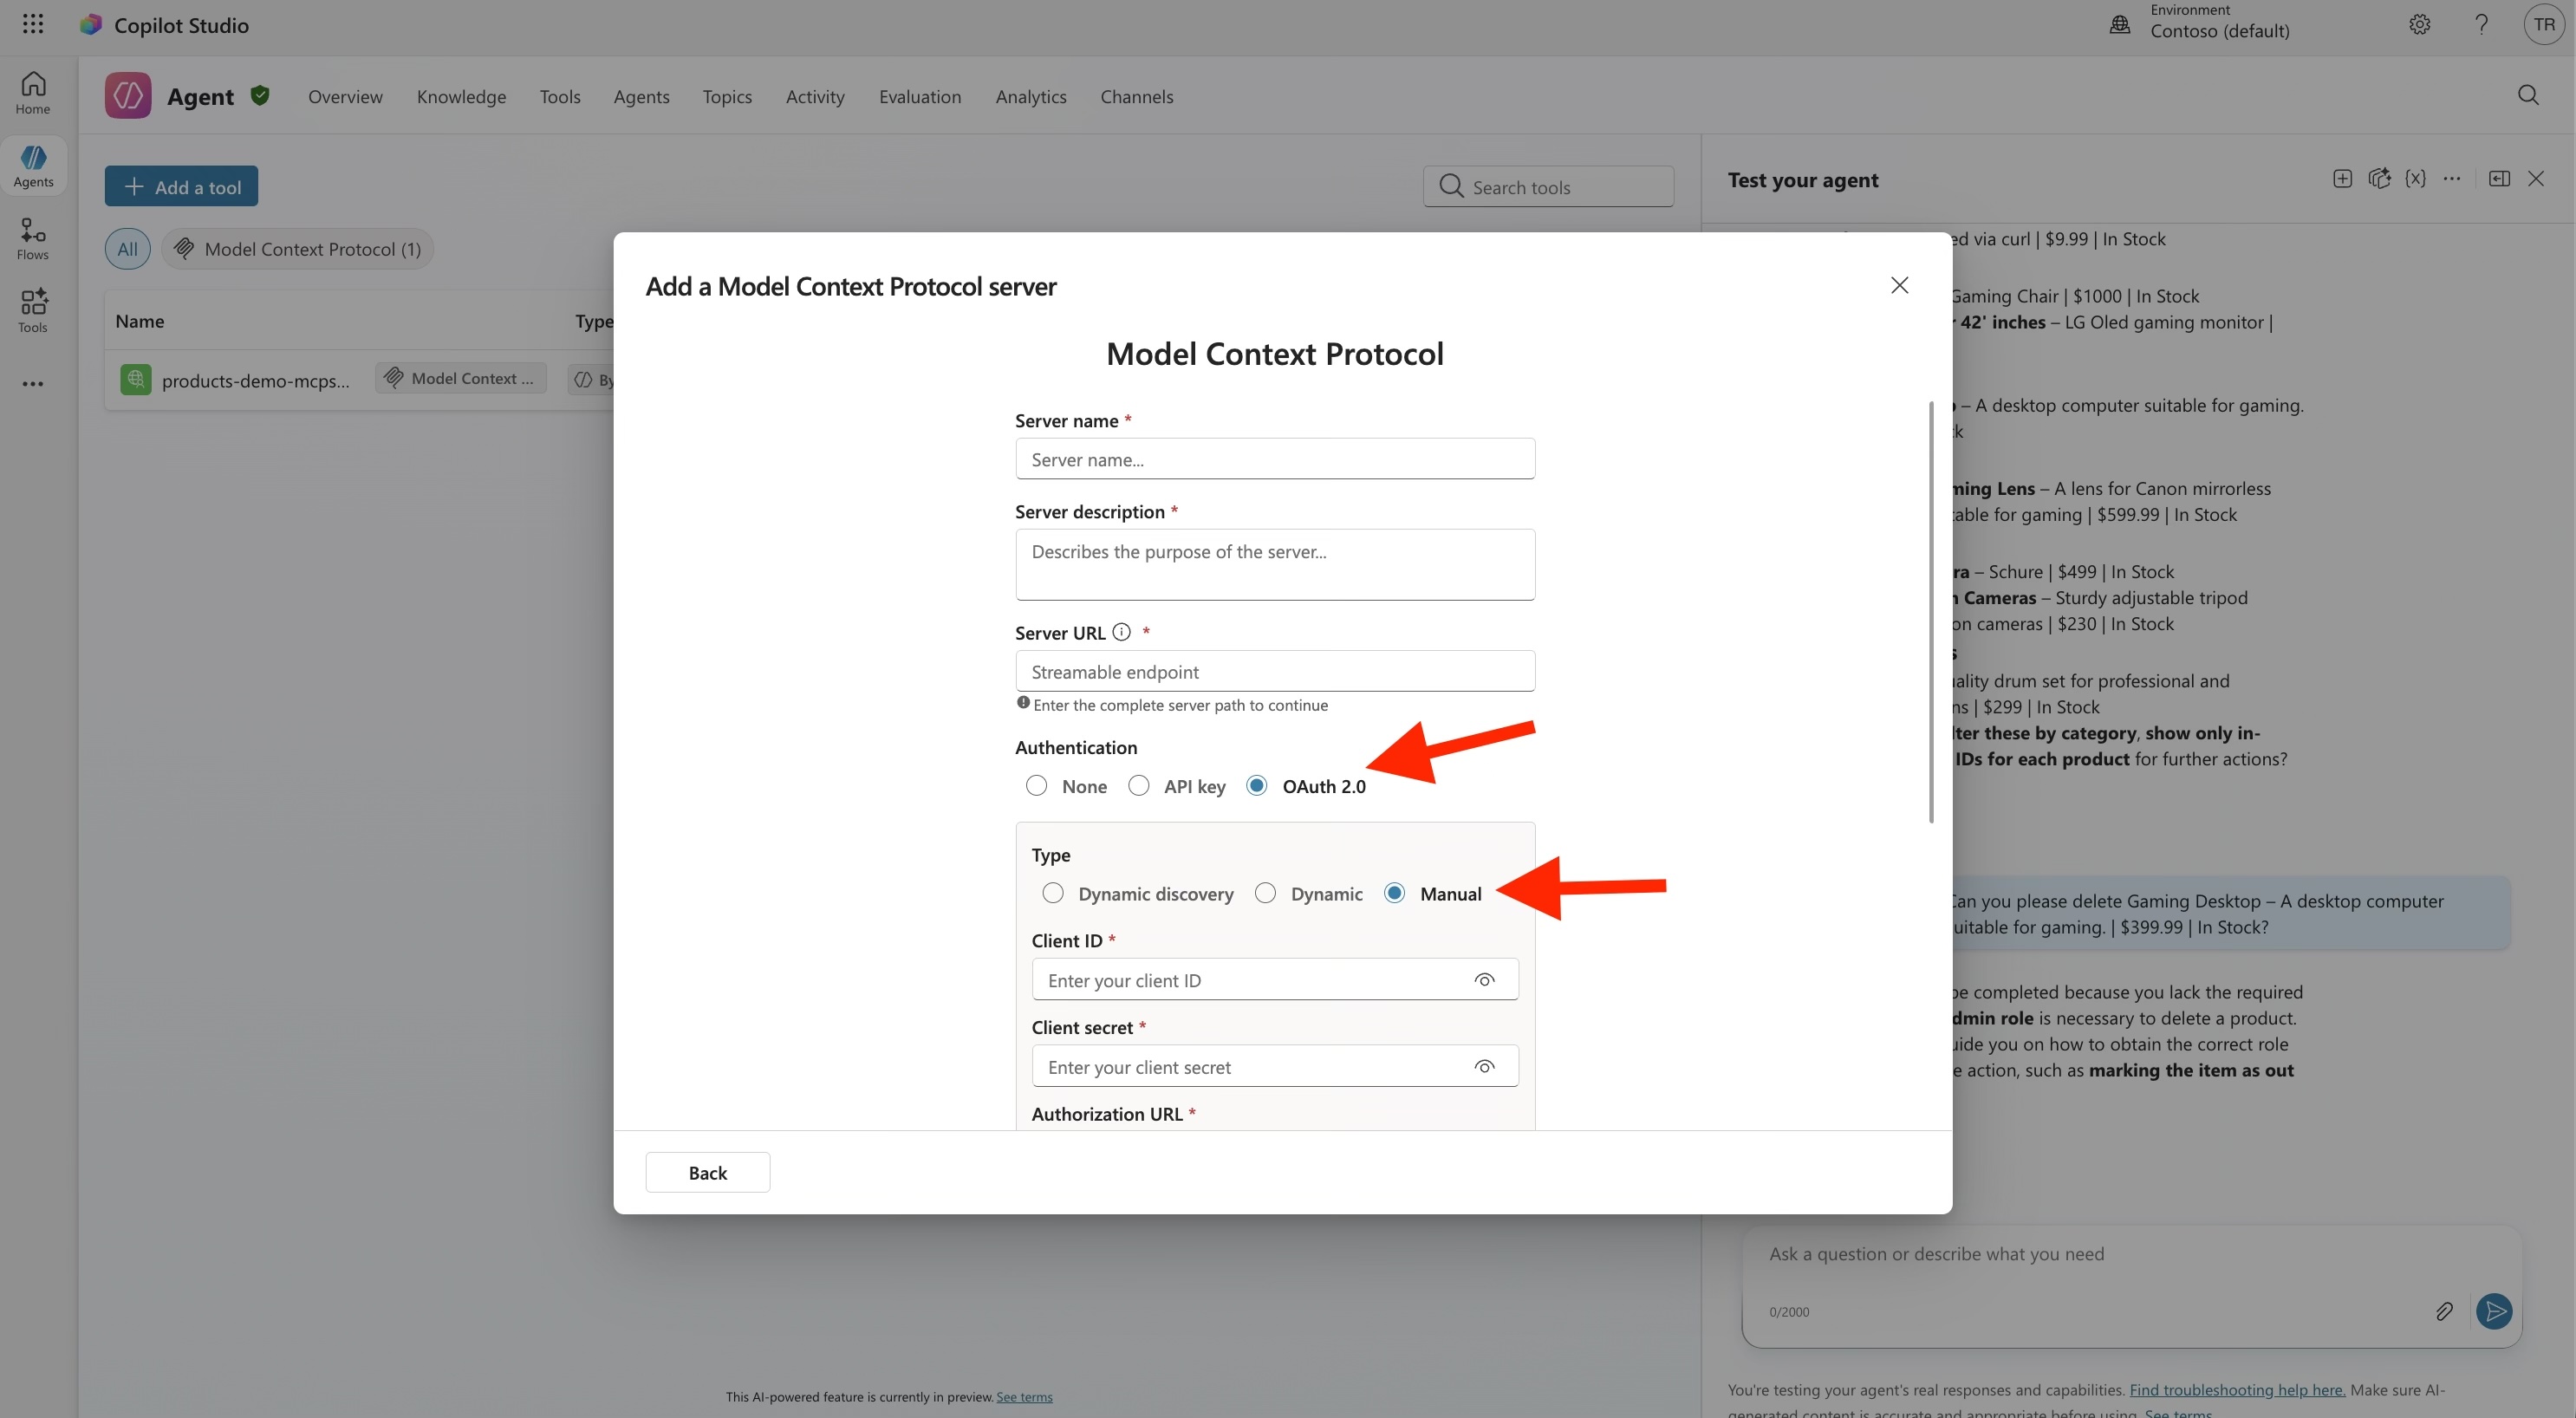
OAuth Configuration
In Copilot Studio, when adding the MCP tool, configure OAuth 2.0 with:
| Field | Value |
|---|---|
| Client ID | Your client app’s Application ID |
| Client Secret | From scripts/.env-entra |
| Authorization URL | https://login.microsoftonline.com/{tenant-id}/oauth2/v2.0/authorize |
| Token URL | https://login.microsoftonline.com/{tenant-id}/oauth2/v2.0/token |
| Refresh URL | Same as Token URL |
| Scope | api://{api-app-id}/.default |
The Redirect URI Dance
When you first test the connection, you’ll likely see:
AADSTS50011: The redirect URI specified in the request does not match...The error message contains the exact redirect URI that Copilot Studio is using. Copy it and add it to your client app registration under Authentication → Web → Redirect URIs.
How Copilot Studio’s Token Flow Actually Works
This is something that tripped me up. When you authenticate in Copilot Studio, the token goes through a multi-hop process:
User signs in
    → Copilot Studio gets a token from Entra ID
    → Power Platform's API Hub handles the token exchange
    → A new token with the correct audience reaches your APIM
The token that arrives at your APIM has the user’s roles from their group membership. So if Test Reader signs in through Copilot Studio, the token has "roles": ["Products.Read"] — exactly what your MCP policy checks.
Per-User Role Enforcement in Copilot Studio
A common concern: “Does each user get their own permissions, or does everyone share the same access level?”
Each user gets their own permissions. When you set “Credentials to use: End user credentials” in the MCP tool settings, Copilot Studio acquires a token on behalf of the signed-in user. That token carries the user’s own roles from their Entra ID group membership.
Here’s what that looks like in practice:
| User signs into Copilot Studio | Their group | Token’s roles claim | Can create products? |
|---|---|---|---|
admin@... | MCP Product Admins | ["Products.Admin"] | ✅ Yes |
writer@... | MCP Product Writers | ["Products.Write"] | ✅ Yes |
reader@... | MCP Product Readers | ["Products.Read"] | ❌ 403 Forbidden |
See it in action — Reader user blocked from deleting products:
Two requirements for this to work:
-
The client app registration must have an application-level app role assigned (e.g.,
Products.Admin) — this authorizes the connector to request tokens for the API. Without this, token requests fail entirely. See Creating the Client App above for the full explanation. -
“Credentials to use” must be set to “End user credentials” — this ensures the token contains the individual user’s roles, not just the app’s roles.
⚠️ Gotcha: Reconnect after role changes. If you change a user’s group membership or update app role assignments, you must disconnect and reconnect the connection in Copilot Studio. The connector caches tokens server-side — even incognito mode won’t help. Only a fresh connection forces a new token.
Hard-Won Lessons (The Gotchas)
Here are the things that cost me real debugging time:
1. preserveContent: true Is Not Optional
// ❌ This consumes the body — backend gets empty request → 400
var body = context.Request.Body.As<JObject>();

// ✅ This preserves the body for the backend
var body = context.Request.Body.As<JObject>(preserveContent: true);
Without preserveContent: true, reading the JSON-RPC body in the policy empties it. The backend receives nothing and returns 400 Invalid JSON payload.
2. MCP Server Does NOT Inherit API-Level Policies
I assumed <base /> in the MCP policy would pull in the API-level validate-jwt. It doesn’t. The MCP server runs its own policy independently.
Without validate-jwt in the MCP policy, anyone can list tools and call them — even without a token.
3. Wrap Everything in try/catch
If a token doesn’t have a roles claim (possible with some flows), accessing jwt.Claims["roles"] throws a NullReferenceException. APIM surfaces this as a generic 500 Internal Server Error with no useful details.
// ❌ Crashes if "roles" claim is missing
return String.Join(",", jwt.Claims["roles"]);

// ✅ Handles missing claims gracefully
try {
    if (jwt.Claims.ContainsKey("roles")) {
        return String.Join(",", jwt.Claims["roles"]);
    }
    return "";
} catch {
    return "";
}
4. .Let() Doesn’t Exist in APIM
APIM’s C# expression sandbox is limited. The .Let() LINQ extension method isn’t available. Use multi-line @{ ... } blocks instead.
5. Test with Non-Admin Users
Global admins in Entra ID can bypass role checks. I spent time debugging why my policy “wasn’t working” — it was, just not for admin accounts. Always test with a dedicated non-admin test user.
6. Two Issuers, Not One
Entra ID has both v1 and v2 token endpoints. Depending on how the client acquires the token, the issuer could be either:
https://sts.windows.net/{tenant-id}/(v1)https://login.microsoftonline.com/{tenant-id}/v2.0(v2)
Include both in your validate-jwt policy, or you’ll get intermittent 401s.
7. Entra ID’s Duplicate Value Rule
You can’t use the same value string in both appRoles and oauth2PermissionScopes. If you have an app role called Products.Admin, the delegated scope needs a different value like Products.Admin.Delegated.
The End Result
After all the configuration:
| User | Role | List Products (REST) | List Products (MCP) | Create Product (REST) | Create Product (MCP) | Delete Product (REST) | Delete Product (MCP) |
|---|---|---|---|---|---|---|---|
| Reader | Products.Read | ✅ | ✅ | ❌ 403 | ❌ 403 | ❌ 403 | ❌ 403 |
| Writer | Products.Write | ✅ | ✅ | ✅ | ✅ | ❌ 403 | ❌ 403 |
| Admin | Products.Admin | ✅ | ✅ | ✅ | ✅ | ✅ | ✅ |
| No token | — | ❌ 401 | ❌ 401 | ❌ 401 | ❌ 401 | ❌ 401 | ❌ 401 |
The same permission model, enforced consistently across REST and MCP — just with different mechanisms under the hood.
📸 Tip: Test your auth setup with a non-admin user in both Insomnia (for REST) and Copilot Studio (for MCP) to verify the permission matrix matches the table above.
Summary
| Layer | What It Does |
|---|---|
| Entra ID | Defines who can access what (app roles, groups, scopes) |
| APIM API-level policy | Validates JWT for REST API requests |
| APIM operation-level policies | Checks roles per REST operation |
| APIM MCP server policy | Validates JWT + extracts tool name from JSON-RPC body + checks roles |
| Container App | Just serves the API — knows nothing about auth |
The key insight: MCP authorization requires fundamentally different policies than REST API authorization, because all MCP requests go through a single endpoint. You need to inspect the JSON-RPC body to determine what the user is trying to do, then enforce roles accordingly.
Have questions? Find me at thecodepoet.net.
Related Posts
Enterprise-Grade MCP Servers: App Gateway + Internal APIM + Container Apps
How to deploy an MCP server behind three security layers — with zero public API endpoints, WAF protection, and full network isolation.

Fast Lane or Pit Stop? 🏎️💨
Should You Use Azure OpenAI Realtime API — and When to Hit the Brakes
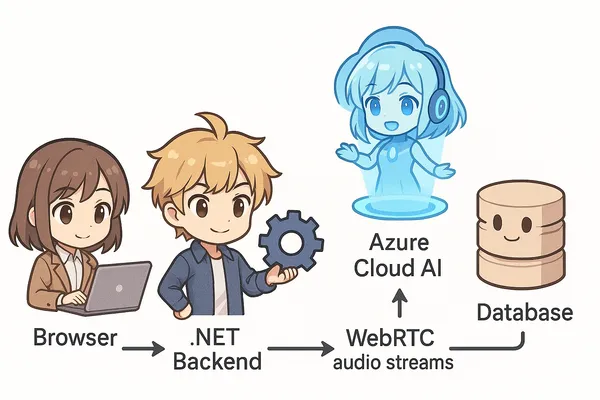
Azure OpenAI Realtime API w/ a .NET + React
What if your AI side-kick could answer *before* you finish talking?